
The city sleeps, bathed in the cool embrace of twilight. Streetlights cast long, dramatic shadows, and the promise of adventure hangs heavy in the air. For film photographers, this nocturnal landscape isn’t just a scene – it’s a canvas waiting to be captured. But unlike digital photography, where night shots are a breeze with a bump in ISO, film photography at night requires a different approach. It’s a slower, more deliberate dance with light and shadow, rewarding those who embrace the challenge with unique and captivating images.
Embracing the Grain: Choosing the Right Film
The first step is selecting your weapon of choice – the film stock. Unlike digital ISO, film has a fixed ISO rating. For night photography, high ISO films (400 and above) are your friends. Films like Kodak Tri-X 400 or Ilford HP5 Plus are great starting points, offering a good balance between grain and low-light performance. For even more adventurous spirits, there are films like Kodak Portra 800 or Cinestill 800T, which push the boundaries of night shooting with even higher ISO and unique color renditions.
Befriending the Tripod: Ensuring Sharpness
With low light comes the need for slow shutter speeds. This is where a sturdy tripod becomes your best friend. A tripod ensures your camera remains perfectly still during the extended exposure, preventing blurry images. While some photographers might use bracing techniques for slower shutter speeds, a tripod offers unmatched stability, especially for long exposures or when shooting with telephoto lenses.
The Dance of Light and Shadow: Mastering Exposure
Night photography with film is all about mastering exposure. Unlike digital, with its instant feedback and forgiving nature, film offers limited opportunities for correction. A light meter becomes your trusted companion. Since night scenes often have high contrast between bright light sources and deep shadows, aim to expose for the shadows. This might mean overexposing some highlights, but film has a wider dynamic range than digital, meaning it can recover more detail in highlights than shadows.
Beyond the Meter: Creative Techniques
While a light meter is a valuable tool, don’t be afraid to experiment! Night photography is a prime time to unleash your creativity. Techniques like long exposures can turn car taillights into streaks of light, painting the urban landscape with a sense of movement. Embrace the grain – it can add a unique atmosphere and grittiness to your photos.
Light Painting: Where Photography Meets Performance Art
For the truly adventurous, night offers the opportunity to play with light itself. Light painting involves using an external light source, like a flashlight or sparkler, to “paint” light onto the scene during a long exposure. This technique allows you to create all sorts of artistic effects, from drawing shapes to writing messages in midair.
The Slow Ritual: Patience is Key
Film photography at night is a slow and deliberate process. There’s a certain beauty in the methodical approach – setting up your tripod, metering the scene, and waiting for that satisfying click of the shutter. This slowness forces you to be more intentional with your shots, to truly consider the scene before you.
The Final Frontier: Processing and Printing
The magic doesn’t end after you capture the image. Film photography rewards those who take the extra step to develop and print their own photos. The anticipation as you watch the image emerge in the developing tray is an unparalleled experience. There are also great film labs that can develop and print your film for you, offering a variety of finishes to bring your vision to life.
Night On Film: A Different Kind of Beauty
Night film photography might seem daunting at first, but the rewards are more than worth it. The unique aesthetic, the slow and deliberate process, and the tangible results in the form of developed film and beautiful prints create a special kind of photography experience. So next time you find yourself drawn to the city lights, grab your film camera, embrace the challenge, and see the world bathed in a new, magical glow.

Now some personal experience…
I’ve spent most of the last two years getting better at night photography on film. Film has its own challenges that digital doesn’t have, but the results are worth it.
It’s easy to shoot film at night, but you need to keep three things in mind to get the right exposure: 1. Using the right type of film, 2. Adjusting for reciprocity failure, and 3. Adjusting the ISO to work with tungsten light sources.
Lately, most of my favorite pictures have been taken at night, especially when there is just a little bit of light left in the sky but all the lights inside are still on. These photos have such a cool vibe, and that’s the time of day that always makes me want to go out and take some of the best shots I can.
Here’s how I took some of my favorite pictures so far.
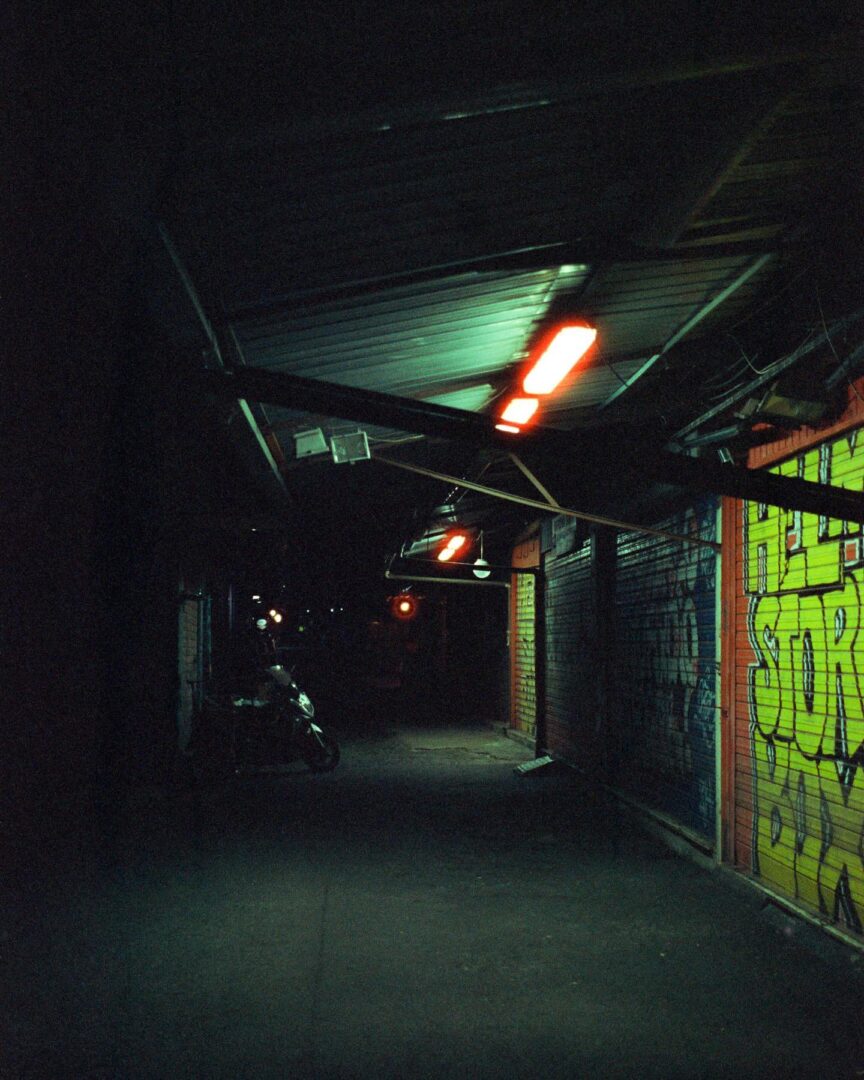
Blue hour on CineStill 800t, which is a good standard color film for taking pictures at night. Halations are the red circles that light sources make when they glow.
1. Pick the right stock of film
It is important to use the right film stock when taking pictures in low light. If you use film with an ISO lower than 400, you will need a tripod or to push the developing process very hard, which will leave you with grainy and contrasty photos.
Ilford Delta 3200 and Kodak T-Max 3200 are the best black-and-white films for taking photos at night (find them on Amazon here). Both of these films are actually ISO 1000, but they can be pushed very well, and even when pushed to ISO 6400, the image quality is still very good.
CineStill 800t is the best color film for low light. It works well up to ISO 3200 and doesn’t need an exposure adjustment under tungsten light. Here is where you can find CineStill film on Adorama or Amazon.
This scene is hard to measure. Do you charge extra for the lights by the sign? Or the dark spots around the picnic table? A regular meter would try to get the right overall exposure, which means that the highlights would be too bright and the shadows would be too dark.
2. The Shadows’ Rhythm
To get the best images when shooting film at night, you always have to be careful with the metering.
When shooting film, as a general rule, you will get better photos if you expose the shadows when there isn’t much light. Film is hard to overexpose because it always picks up more detail in the highlights than in the shadows. For this reason, it is always better to use a longer exposure time to make sure the shadows have good details.
You can overexpose the highlights and still get all the detail back (especially if you use an HDR scan). But if the shadows are too dark, they won’t be able to be brought back.
Using a spot meter to read the exposure in the shadows is the best way to get perfect exposure on film at night. Light Meter by WBPhoto is a phone app that can be used as a cheap spot meter. I use this app to measure everything because it has a spot meter and an exposure preview.
At night, neon lights with a cinematic Kodak Gold look
At night, you can use Kodak Gold to make pictures that look like movies.
3. Put your subject in the “Highlights” section (or use Flash)
When you take pictures at night, you have to use the shadows to your advantage.
Make sure your subject is always in the light. So, even if you lose a little shadow detail when pushing the film, the colors will still stand out. When the rest of the image is in shadow, it makes images that are clean and look like they were meant to be that way.
Use a camera with a flash if there aren’t any good light sources. Most point-and-shoot cameras, like the very popular Ilford Sprite 35-II, have a flash that works perfectly as long as your subject is in range.
The flash on today’s cameras also does a great job of softening skin and giving your subjects that luminous glow and trendy hard-shadow look.
Most color film is made for daylight, so it needs to be adjusted for tungsten light sources, like street lamps, to get the right exposure. I had to learn this the hard way, but it was a big change for me.
For example, Kodak Portra 400 can be shot at ISO 400 during the day, but under tungsten street lights, it works like an ISO 100 film.
Most black-and-white films are panchromatic, which means that you don’t have to change the ISO when you use them in tungsten light. But if you are using orthochromatic film, which is not affected by red light, make sure to adjust the exposure.
Before you use your film at night, you should always check the technical data sheets. These sheets from the manufacturers have a wealth of information on them.
A dark picture was taken by hand with Ilford Delta 3200 at night.
5. Calculate for reciprocity failure
Reciprocity is the idea that if you open the aperture with one click, the same amount of light will come in as if you used a slower shutter speed with one click. For example, if you are shooting at 1/125 and f/5.6, you can get the same exposure by using f/8 and 1/60th or f/4 and 1/250th. But when it comes to film, reciprocity breaks down when exposure times are longer than one second.
Reciprocity failure happens when low-intensity light can’t carry as much energy per unit as high-intensity light can. So, in most film stocks, the film grains need more low-intensity light to be able to be developed. Almost every film will need a simple exposure adjustment after 1 second to get the right exposure.
The only film that doesn’t follow this rule is Fuji Acros II, which uses a patented method to make the film sensitive which means it doesn’t need a reciprocity failure adjustment until it needs to be exposed for more than 2 minutes.
The light trails were caught on film.
With long exposure to Portra 400, you can see light trails and inhalations.
The simple formula for figuring out if two people owe each other money
Every film has a different spectral sensitivity in low light and needs a slightly different exposure adjustment, which you can find on its technical data sheet with a quick Google search. But most films are in the same general range, so you can use the same calculation for almost all of them.
The simple way to figure it out is to multiply your meter’s reading (in seconds) by 1.31. If you’ve tried to avoid math as much as possible, you can use the xy symbol on your phone’s calculator to figure this out.
Using the formula (metered shutter speed in seconds)1.31, a 2-second exposure becomes 2.5 seconds to account for reciprocity failure, while a 15-second exposure becomes 34.7 seconds. Using the same formula, an exposure of 120 seconds (2 minutes) becomes 530 seconds (8.8 minutes).
With this recipe for reciprocity, you can make sure that every exposure is perfect.
CineStill 400D caught the moon rising over Siwash Rock in Vancouver, BC. This moody photo could not have been taken without a tripod and a remote shutter release.
6. Use a tripod and a remote release to take pictures.
You can take better film photos at night if you use a tripod and a remote shutter release.
When you press the shutter button on a camera, it’s almost impossible to keep it still. I’ve used a tripod to take hundreds of photos, and no matter how careful I am or how steady the tripod is, the camera always moves when I press the shutter button.
You can also use a remote timer and mirror lockup on your camera to cut down on shake. But if you use a remote shutter release, you can better time your shots, which is important when there is action in the frame.
Remote shutter releases are universal, so a cable release will work on almost any manual film camera. I use this one from Amazon. Only modern point-and-shoot cameras and toy cameras with fixed exposure settings might not work.
I also recommend the Peak Design Travel Tripod, which is small and easy to carry. I’ve found it to be a very useful tool that hasn’t left my bag since I got it. You can find the best deal on the Peak Design website or read my full review of the Peak Design travel tripod.
A 30-second exposure at late blue hour. This picture was set to take 2 seconds, but I overexposed it to make the light trails longer and make sure there was enough detail in the shadows.
7. Use manual focus
Any film camera’s autofocus will be hard to use at night, so the best way to get sharper pictures is to use manual focus.
Keep the aperture wide open and move the focus ring back and forth until the subject of your photo is in good light. If you don’t get the exposure just right, using a smaller aperture will make sure that more of the picture is in focus, but you’ll need to use a longer shutter speed or a tripod.
If all you need is infinity focus, looking at the moon is the easiest way to find it. Don’t just turn the focusing ring until it says “infinity.” Older lenses may stop at the infinity focus point, but many of the newer ones go past that point. They go past infinity so that they can account for small changes in the glass when it gets hotter or colder.
A lot of light can come from things like concerts and street lights. When the subject is well-lit, metering for the highlights and ignoring the shadows can make for some really interesting images with a lot of contrast.
8. If you need faster speeds, push your film.
If you don’t want to use a tripod at night, what should you do? There is no doubt that you can take night photos with shutter speeds that are fast enough to make a sharp image while holding the camera by hand. If you want to take photos with your hands, you’ll need to push your film to get a faster shutter speed.
When you push the film during development, the ISO goes up. This lets you use faster shutter speeds, but it also makes your photos look more contrasty.
There are ways to reduce contrast (like stand development) and film developers (like DD-X) that do so, but in the end, it’s only a good idea when you need that extra speed.
Just mark any film you want to be developed before giving it to the lab. This service may come with an extra fee.
NEOWISE Coment got on camera
With the right settings, you can take photos of things like the Neowise comet. The Pentax Takumar 135mm f/3.5 lens was used to take a picture on Ilford Delta 3200 film.
Last thing to say
This article could easily go on for another thousand words and still not cover everything there is to know about getting the right exposure on film at night. Let me know in the comments below if you have any other questions or tips about taking pictures at night. I love getting feedback, and your questions will help more people find this article.
Negative Lab Pro’s creator has 13 tips for using a DSLR to scan film. Nate DSLR film scanning light sources: 3rd-generation iPad vs. Amazon tracing tablet
6 thoughts on “Everything You Need to Know About Making Movies at Night”
Craig
If the halation is too big, it’s usually because the light source is either too big in the frame or out of focus. Stopping down the aperture and moving back a bit or using a wider lens can both help here to get the light more in focus. If you can, you could also make an HDR scan of the negative. Halation reduction was one thing I noticed when I tried making an HDR scan for this article, but I’m not sure if it was a one-time thing or not.
Helpful, right? If it’s possible, I’d love to see the picture. It might help me give you better advice.

HOW TO EXPOSE FILM CORRECTLY AT NIGHT
The information provided here is typical of what I do while exposing film at night or inside with very little light. This allows me to collect enough light and produce really beautiful negatives. Few people are aware that film has a stronger capacity to catch light than digital sensors. What I mean is that when film is correctly exposed, the spectrum of tones is broader. So, in order to catch enough light on film and have the range you need, you must do it correctly.
A digital camera may help you generate an image with a wide dynamic range by taking many shots with HDR photography and then stitching them together in Photoshop. This means that multiple processes are required to get the same range of tones as a single well-exposed negative. With so many applications and editing programs available, your possibilities are limitless! That is very kind of you. Despite these benefits, many people who own pricey cameras are unskilled with the foundations of photography and will just have “beautiful” photographs on their Facebook wall. Film allows you to have a better knowledge of the various procedures that go into creating a strong print ideal for framing. These guidelines are intended to assist you in producing consistent high-quality negatives.
One of the challenges for many film photographers is properly exposing the film at night. Because shutters change across cameras, you must conduct your own testing to obtain satisfactory results. You must appropriately expose the film and ensure that you expose for the shadows and develop for the highlights. For many years, this has been the mantra of many outstanding photographers. Film may capture fine detail in the shadows and highlights, but if the developing process is not controlled, the highlights will turn out as white patches with no detail. You may adjust the highlights by managing the development process. This will result in photographs with excellent tone.
In the hopes that you will return, we are giving you our popular photography tactics eBook as well as additional ideas to help you get started producing stunning photos:
Because film cameras do not record everything you do in the field, bring a notepad to record everything you do with the camera. Bring a tripod, cable release, flashlight, and plenty of patience. Patience is possibly the most critical aspect of the filmmaking process. Also, don’t just shoot everything; be picky about what you capture. Remember that a roll of film only has 24 or 36 exposures; make every shot count as if it were the only one you’d ever take. This will make you a very decent, if not great, photographer.
To begin with, film does not respond to artificial light in the same way that digital camera sensors do. If you want a film that responds to all sorts of light, I recommend panchromatic film. What exactly is panchromatic? Panchromatic film is a black-and-white film that is sensitive to all visible hues of light (electromagnetic wavelengths between 400 nm and 700 nm). Other forms of film exist, such as orthochromatic film, which is not sensitive to all light waves (colors).
Ilford films are highly recommended by me. I generally use Ilford HP5 since it has very minimal grain (if you expose it correctly). The second film I recommend is Kodak Tri-X, which is a classic. A touch too grainy for my tastes, but still a fantastic film.
Check that everything is in functioning condition before loading the film into the camera: Apertures, shutter speeds, and a light meter are all included. Because we’re attempting to expose the film appropriately, don’t set the ASA in the camera to 400, which is the film’s rating. This number will offer you adequate but not exceptional negatives. Set your ASA to 200 and pay attention to the light meter! This means making certain that you do not over or underexpose each photo. Of course, you don’t have to do this all the time; only when you want really positive negatives! Some students overexposed their negatives in addition to the ASA sensitivity adjustment and then wish to underdevelop the roll based on what they read on the internet! Wrong! Develop the film normally and at the appropriate time. You want one stop of overexposure in your negatives; otherwise, if you under-develop, you will erase this compensation and ruin the rest of the properly exposed photographs on the roll.
So the camera is set up, the film is loaded, and everything is operating well. You are now prepared to expose film. However, while shooting film at night, it loses speed and the real film speed or ASA is no longer applicable. As a result, you must account for this and adjust for Reciprocity Failure or’reciprocity rule’ (what happens to film at night, or indoors with artificial light and very long exposure).
Go to a dark (and safe) part of your street; it doesn’t matter what you shot; your priority right now is to study before you create. Set your camera on a tripod, attach the cable release, and turn the ASA dial all the way up. Set it to 1600 or 3200 ASA for older cameras. Set your lens at its largest aperture, say f/2.8. Examine your light meter and note the shutter speed. What exactly is it? If you are in an extremely dark environment, your light meter will most likely give you a lengthy exposure even if the ASA is set to 1600. Assume that the correct time indicated by the light meter is 2 seconds. This might be half-ok if you had 1600 ASA film in the camera, but you don’t. Remember, we’re using Ilford HP5 400 at 200 ASA. Make a copy of this sample chart in your notebook so you can refer to it later:
Equivalent Exposures on a Film Chart
Of course, you will not have the same aperture and shutter speeds as in this example; this chart is only a reference for computation. Begin by halving the ASA; each halving equates to one full stop of exposure, so just twice the shutter speed and the exposure duration will be right.
So, with the film in the camera, your exposure is 16 seconds, but this is before adjusting for reciprocity failure or a variable lens aperture. I know that using the lens wide open is a wonderful idea, but perhaps you could use a narrower aperture, like f/8. The table is valid for the film and ASA in your camera, but not for an aperture of f/8. Continue adjusting the aperture. Please bear in mind that now that we’ve determined the proper exposure for 200 ASA film, we preserve that ASA and simply modify the aperture of the lens! We double the exposure time to compensate for cutting the quantity of light in half every time we close the aperture of the lens. ALL of these combinations will result in the same amount of light in the film; this is known as reciprocal exposures.
Can you envision a 256-second exposure? This is without taking into account the lack of reciprocity.
So, what exactly is reciprocity? Why is it important to adjust for film exposure? Before we continue with the chart, let me explain the Reciprocity Law, often known as the Schwarzschild Effect.
FAILURE IN RECIPROCITY
Reciprocity is valid with reasonable accuracy for most photographic materials throughout a range of exposure time values, but becomes progressively incorrect as we move from this range. As the light level falls out of range, the duration, and hence total exposure, necessary to induce an equal reaction increases more than the formula implies. At half the light necessary for a regular exposure, for example, the time must be more than quadrupled to achieve the same outcome. Reciprocity factors are multipliers that are used to adjust for this impact.
Long Exposure at Union Station
Film is less receptive at very low light conditions. Light may be seen of as a stream of discrete photons, and a light-sensitive emulsion is made up of discrete light-sensitive grains, which are often silver halide crystals. In order for the light-driven reaction to proceed and the latent picture to develop, each grain must absorb a particular amount of photons. If the surface of the silver halide crystal contains a cluster of four or more reduced silver atoms as a result of absorption of a significant number of photons (typically a few hundred photons), it is rendered developable. Photons impinge on each grain relatively infrequently at low light levels, i.e. few photons per unit time; if the four photons required arrive over a long enough interval, the partial change due to the first one or two is not stable enough to survive before enough photons arrive to form a permanent latent image center.
Reciprocity failure refers to a breakdown in the customary tradeoff between aperture and shutter speed. At low light conditions, each film type responds differently. Some films are extremely vulnerable to reciprocity failure, while others are far less so. Some films that are extremely light sensitive at standard illumination levels and exposure durations lose a significant amount of sensitivity at low light levels, thereby becoming “slow” films for lengthy exposures. Some films that are “slow” under standard exposure length, on the other hand, retain their light sensitivity better under low light levels.
Another example: If a light meter displays a needed EV of 5 for a certain film and the photographer sets the aperture at f/11, a 4-second exposure is normally required; a reciprocity correction factor of 1.5 would necessitate a 6-second exposure for the same outcome. Reciprocity failure usually becomes noticeable at exposure times greater than around 1 second for film and 30 seconds for paper.
Reciprocity also fails at extremely high levels of light with extremely short exposure times. This is a concern for scientific and technical photographers, but not for general photographers, because exposures much shorter than a millisecond are only required for subjects such as explosions and particle physics experiments, or when taking high-speed motion pictures with extremely fast shutter speeds (1/10,000 of a second or faster).
Finally, here is another chart in which I use 100 ASA film at a very tiny aperture of the lens and adjust for reciprocity. Remember that the longer you expose film, the slower it becomes; this is why I compensate in percentages.
Because they didn’t want people in the image (below), yet this lobby is bustling 24 hours a day, I ended up shooting the picture with a tiny aperture using a Linhoff medium format camera and exposure it for 32 minutes after reciprocity adjustment.
Film photography is much more than simply pressing a button and hoping for the best. Can digital provide beautiful images? Without a doubt! Can you make the same long exposures with your digital camera? Absolutely! But, when compared to film, nothing beats the joy of watching your first print, which you meticulously prepared, developed, tested, and exposed, emerge slowly in a developer tray.

10 Tips For Better Night Film Photography

Film photography is making a significant comeback on the international photographic scene, revealing fresh and long-forgotten ways of capturing the moment. Night film photography, in particular, is a true art to master, and as with any other ability, practice truly does make perfect.
Regardless of the difficulties that may arise, you should not be surprised by them. In this post, we’ll look at the top 10 techniques for getting started with night film photography and getting the greatest photos.
Select High ISO Films
Film shooting at night with low to no light presents additional problems; thus, the equipment you use will impact the success of the images you subsequently develop.
When photographing at night, higher ISO films provide you more options. Films like Kodak Portra 800 or Cinestill 800T are excellent candidates. Low ISO can still be effective, but it may result in additional grain and possibly some off-colors in the shadows if not correctly exposed.
The ISO 800 setting allows you a faster shutter speed, allowing you to freeze action whenever you choose. Because of the tungsten balance, which allows lights on exterior structures to show through in their natural color, the Cinestill 800T is a choice for filming at night.
Check that the camera is stable.
Keeping everything motionless is the method to produce the sharp shot we all want in film photography, and it is even more important while recording in low illumination with long exposures. There are, however, a few strategies to avoid a fuzzy photo.
The first is to use a shutter speed of roughly 1/15th of a second if you want to keep your hands stationary during the capture. The second and more dependable method is to set your camera on a tripod to keep it as stable as possible. Finally, cable release is useful for night shooting. It prevents fuzzy photos from occurring as a result of pushing the shutter and causing minimal camera movement.
Make use of a light meter.
Getting the exposure correct in poor lighting is a typical issue for many film photographers. Metering light via the lens is useful for determining the right exposure duration while photographing in well-lit areas, but it is not the ideal solution for photography in low light. A handheld meter will assist you in appropriately setting the aperture for the lengthy exposures required in night photography.
Experiment with Different Exposures
You can experiment with extra overexposure on the film in addition to utilizing a spot meter. Because of the stark difference between highlights and shadows at night, you may find yourself either overexposing or underexposing the film. In low-light situations, we recommend increasing the exposure. Even if you slightly overexpose the highlights, you can still recover information during scanning, however underexposure is irreversible.
Examine the Technical Data Sheet
Check the technical data sheets before planning your night photography, as certain films may require exposure modification to function best with street illumination at night. Films may react differently in darker lighting depending on the kind. Some perform adequately in daytime but are insufficiently responsive in low light. As a result, make sure you change the ISO and calculate the correct exposure compensation.
Reciprocity Failure Calculation
Reciprocity failure occurs when the reciprocity law, which governs the proper correlation of shutter speed and aperture for proper exposure, fails. This happens in low-light situations with shutter speeds of one second or greater, when the chemical reaction takes longer to complete and the picture is created. The exposure time can be adjusted to compensate for the reciprocity failure. A common rule is to use the 1.31 equation and the metered exposure time on your camera. This will give you a longer exposure time than your meter suggests, compensating for the exposure duration in poor illumination.
Attempt Black & White ISO
When first starting out with night film photography, you may find that using high black and white ISO film rather than color film is simpler. This allows you to take more pictures with faster shutter speeds and catch emotions and precise moments on the fly. Color film requires longer exposures, making this impractical. However, if you can meter the light and expose the image for the necessary amount of time, both color and black & white ISO will work wonderfully for night photography.
Make the Most of Your Available Lighting
If your filming location of choice is in an urban area, you may benefit from stronger street illumination. As a beginner in night film photography, street lights will be your best friend. It provides you more creative flexibility, decreases the possibility of color shifts and reciprocity failure, and makes it easier to meter short exposures.
When choosing on a shooting time, you may choose the hour immediately following sunset. The scene will still appear to be at night, especially if you are near all of the street and house lights in the metropolitan area, but there will be enough light from the sky to allow you to meter the precise exposure duration.
Play Around With Light Painting
Remember that night film photography is all about having fun and experimenting in order to capture the precise moment you’ve imagined. For example, shooting on film at night provides an ideal chance for light painting. Set your shutter speed to a low setting of 1 second or more for this, which will not only allow enough light to strike your film for exposure but will also allow you to create movement with lights. So bring a flashlight or use one on your phone and start moving it about while the shutter is open to generate unique images.
0 Comments